Tuesday, April 10, 2018

A simple method of measuring audio latency

In my previous blog post, I talked about how I improved the latency of GStreamer's default audio capture and render elements on Windows.

An important part of any such work is a way to accurately measure the latencies in your audio path.

Ideally, one would use a mechanism that can track your buffers and give you a detailed breakdown of how much latency each component of your system adds. For instance, with an audio pipeline like this:

audio-capture → filter1 → filter2 → filter3 → audio-output

If you use GStreamer, you can use the latency tracer to measure how much latency filter1 adds, filter2 adds, and so on.

However, sometimes you need to measure latencies added by components outside of your control, for instance the audio APIs provided by the operating system, the audio drivers, or even the hardware itself. In that case it's really difficult, bordering on impossible, to do an automated breakdown.

But we do need some way of measuring those latencies, and I needed that for the aforementioned work. Maybe we can get an aggregated (total) number?

There's a simple way to do that if we can create a loopback connection in the audio setup. What's a loopback you ask?

Ouroboros snake biting its tail

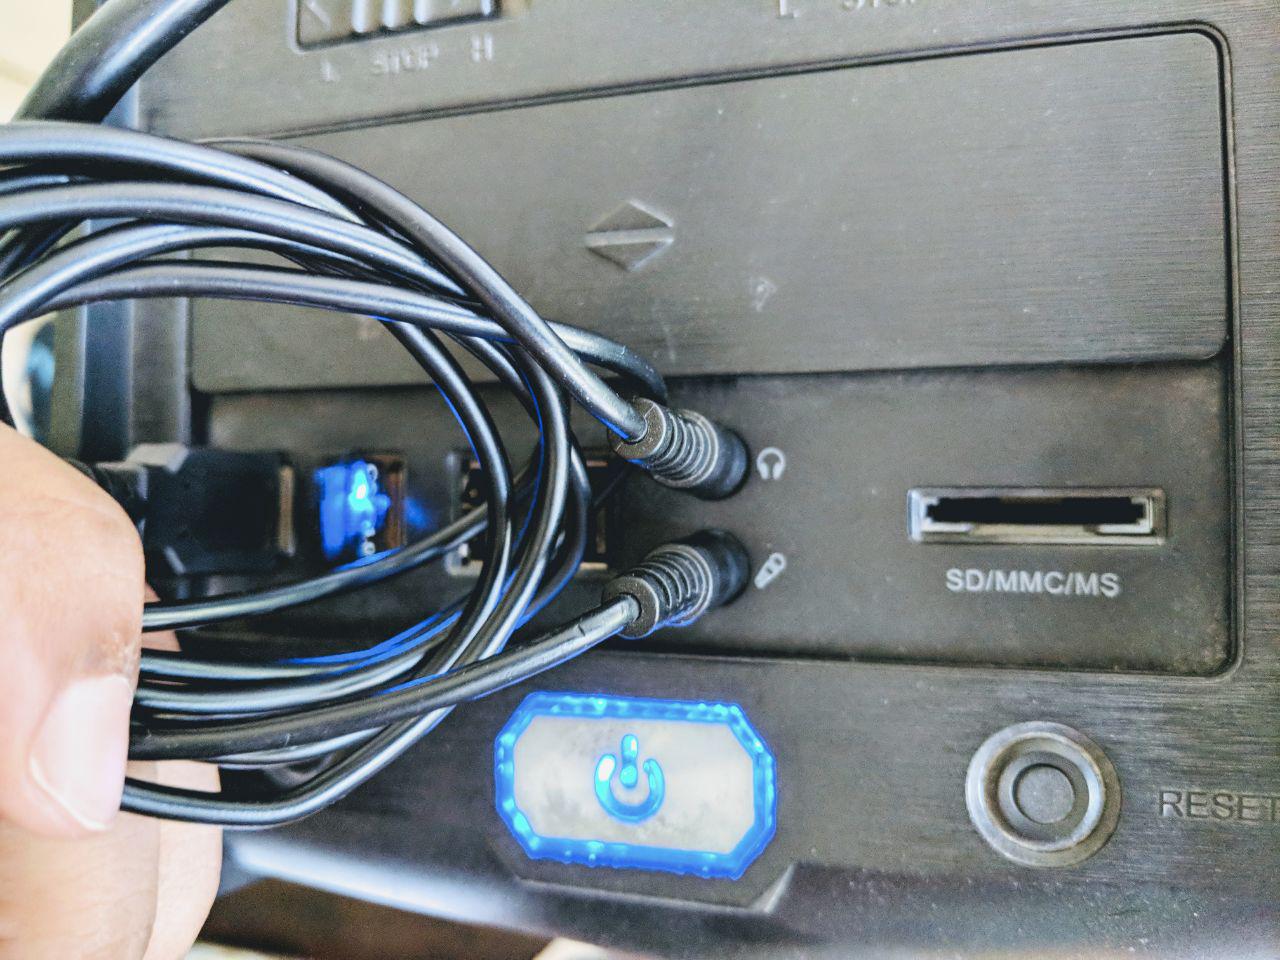
Essentially, if we can redirect the audio output back to the audio input, that's called a loopback. The simplest way to do this is to connect the speaker-out/line-out to the microphone-in/line-in with a two-sided 3.5mm jack.

photo of male-to-male 3.5mm jack connecting speaker-out to mic-in

Now, when we send an audio wave down to the audio output, it'll show up on the audio input.

Hmm, what if we store the current time when we send the wave out, and compare it with the current time when we get it back? Well, that's the total end-to-end latency!

If we send out a wave periodically, we can measure the latency continuously, even as things are switched around or the pipeline is dynamically reconfigured.

Some of you may notice that this is somewhat similar to how the `ping` command measures latencies across the Internet.

screenshot of ping to 192.168.1.1


Just like a network connection, the loopback connection can be lossy or noisy, f.ex. if you use loudspeakers and a microphone instead of a wire, or if you have (ugh) noise in your line. But unlike network packets, we lose all context once the waves leave our pipeline and we have no way of uniquely identifying each wave.

So the simplest reliable implementation is to have only one wave traveling down the pipeline at a time. If we send a wave out, say, once a second, we can wait about one second for it to show up, and otherwise presume that it was lost.

That's exactly how the audiolatency GStreamer plugin that I wrote works! Here you can see its output while measuring the combined latency of the WASAPI source and sink elements:


The first measurement will always be wrong because of various implementation details in the audio stack, but the next measurements should all be correct.

This mechanism does place an upper bound on the latency that we can measure, and on how often we can measure it, but it should be possible to take more frequent measurements by sending a new wave as soon as the previous one was received (with a 1 second timeout). So this is an enhancement that can be done if people need this feature.

Hope you find the element useful; go forth and measure!

Thursday, March 22, 2018

Low-latency audio on Windows with GStreamer

Digital audio is so ubiquitous that we rarely stop to think or wonder how the gears turn underneath our all-pervasive apps for entertainment. Today we'll look at one specific piece of the machinery: latency.

Let's say you're making a video of someone's birthday party with an app on your phone. Once the recording starts, you don't care when the app starts writing it to diskas long as everything is there in the end.

However, if you're having a Skype call with your friend, it matters a whole lot how long it takes for the video to reach the other end and vice versa. It's impossible to have a conversation if the lag (latency) is too high.

The difference is, do you need real-time feedback or not?

Other examples, in order of increasingly stricter latency requirements are: live video streaming, security cameras, augmented reality games such as Pokémon Go, multiplayer video games in general, audio effects apps for live music recording, and many many more.

“But Nirbheek”, you might ask, “why doesn't everyone always ‘immediately’ send/store/show whatever is recorded? Why do people have to worry about latency?” and that's a great question!

To understand that, checkout my previous blog post, Latency in Digital Audio. It's also a good primer on analog vs digital audio!

Low latency on consumer operating systems


Each operating system has its own set of application APIs for audio, and each has a lower bind on the achievable latency:


GStreamer already has plugins for almost all of these¹ (plus others that aren't listed here), and on Windows, GStreamer has been using the DirectSound API by default for audio capture and output since the very beginning.

However, the DirectSound API was deprecated in Windows XP, and with Vista, it was removed and replaced with an emulation layer on top of the newly-released WASAPI. As a result, the plugin can't be configured to have less than 200ms of latency, which makes it unsuitable for all the low-latency use-cases mentioned above. The DirectSound API is quite crufty and unnecessarily complex anyway.

GStreamer is rarely used in video games, but it is widely used for live streaming, audio/video calls, and other real-time applications. Worse, the WASAPI GStreamer plugins were effectively untouched and unused since the initial implementation in 2008 and were completely broken².

This left no way to achieve low-latency audio capture or playback on Windows using GStreamer.

The situation became particularly dire when GStreamer added a new implementation of the WebRTC spec in this release cycle. People that try it out on Windows were going to see much higher latencies than they should.

Luckily, I rewrote most of the WASAPI plugin code in January and February, and it should now work well on all versions of Windows from Vista to 10! You can get binary installers for GStreamer or build it from source.

Shared and Exclusive WASAPI


WASAPI allows applications to open sound devices in two modes: shared and exclusive. As the name suggests, shared mode allows multiple applications to output to (or capture from) an audio device at the same time, whereas exclusive mode does not.

Almost all applications should open audio devices in shared mode. It would be quite disastrous if your YouTube videos played without sound because Spotify decided to open your speakers in exclusive mode.

In shared mode, the audio engine has to resample and mix audio streams from all the applications that want to output to that device. This increases latency because it must maintain its own audio ringbuffer for doing all this, from which audio buffers will be periodically written out to the audio device.

In theory, hardware mixing could be used if the sound card supports it, but very few sound cards implement that now since it's so cheap to do in software. On Windows, only high-end audio interfaces used for professional audio implement this.

Another option is to allocate your audio engine buffers directly in the sound card's memory with DMA, but that complicates the implementation and relies on good drivers from hardware manufacturers. Microsoft has tried similar approaches in the past with DirectSound and been burned by it, so it's not a route they took with WASAPI³.

On the other hand, some applications know they will be the only ones using a device, and for them all this machinery is a hindrance. This is why exclusive mode exists. In this mode, if the audio driver is implemented correctly, the application's buffers will be directly written out to the sound card, which will yield the lowest possible latency.

Audio latency with WASAPI


So what kind of latencies can we get with WASAPI?

That depends on the device period that is being used. The term device period is a fancy way of saying buffer size; specifically the buffer size that is used in each call to your application that fetches audio data.

This is the same period with which audio data will be written out to the actual device, so it is the major contributor of latency in the entire machinery.

If you're using the AudioClient interface in WASAPI to initialize your streams, the default period is 10ms. This means the theoretical minimum latency you can get in shared mode would be 10ms (audio engine) + 10ms (driver) = 20ms. In practice, it'll be somewhat higher due to various inefficiencies in the subsystem.

When using exclusive mode, there's no engine latency, so the same number goes down to ~10ms.

These numbers are decent for most use-cases, but like I explained in my previous blog post, this is totally insufficient for pro-audio use-cases such as applying live effects to music recordings. You really need latencies that are lower than 10ms there.

Ultra-low latency with WASAPI


Starting with Windows 10, WASAPI removed most of its aforementioned inefficiencies, and introduced a new interface: AudioClient3. If you initialize your streams with this interface, and if your audio driver is implemented correctly, you can configure a device period of just 2.67ms at 48KHz.

The best part is that this is the period not just in exclusive mode but also in shared mode, which brings WASAPI almost at-par with JACK and CoreAudio

So that was the good news. Did I mention there's bad news too? Well, now you know.

The first bit is that these numbers are only achievable if you use Microsoft's implementation of the Intel HD Audio standard for consumer drivers. This is fine; you follow some badly-documented steps and it turns out fine.

Then you realize that if you want to use something more high-end than an Intel HD Audio sound card, unless you use one of the rare pro-audio interfaces that have drivers that use the new WaveRT driver model instead of the old WaveCyclic model, you still see 10ms device periods.

It seems the pro-audio industry made the decision to stick with ASIO since it already provides <5ms latency. They don't care that the API is proprietary, and that most applications can't actually use it because of that. All the apps that are used in the pro-audio world already work with it.

The strange part is that all this information is nowhere on the Internet and seems to lie solely in the minds of the Windows audio driver cabals across the US and Europe. It's surprising and frustrating for someone used to working in the open to see such counterproductive information asymmetry, and I'm not the only one.

This is where I plug open-source and talk about how Linux has had ultra-low latencies for years since all the audio drivers are open-source, follow the same ALSA driver model, and are constantly improved. JACK is probably the most well-known low-latency audio engine in existence, and was born on Linux. People are even using Pulseaudio these days to work with <5ms latencies.

But this blog post is about Windows and WASAPI, so let's get back on track.

To be fair, Microsoft is not to blame here. Decades ago they made the decision of not working more closely with the companies that write drivers for their standard hardware components, and they're still paying the price for it. Blue screens of death were the most user-visible consequences, but the current audio situation is an indication that losing control of your platform has more dire consequences.

There is one more bit of bad news. In my testing, I wasn't able to get glitch-free capture of audio in the source element using the AudioClient3 interface at the minimum configurable latency in shared mode, even with critical thread priorities unless there was nothing else running on the machine.

As a result, this feature is disabled by default on the source element. This is unfortunate, but not a great loss since the same device period is achievable in exclusive mode without glitches.

Measuring WASAPI latencies


Now that we're back from our detour, the executive summary is that the GStreamer WASAPI source and sink elements now use the latest recommended WASAPI interfaces. You should test them out and see how well they work for you!

By default, a device is opened in shared mode with a conservative latency setting. To force the stream into the lowest latency possible, set low-latency=true. If you're on Windows 10 and want to force-enable/disable the use of the AudioClient3 interface, toggle the use-audioclient3 property.

To open a device in exclusive mode, set exclusive=true. This will ignore the low-latency and use-audioclient3 properties since they only apply to shared mode streams. When a device is opened in exclusive mode, the stream will always be configured for the lowest possible latency by WASAPI.

To measure the actual latency in each configuration, you can use the new audiolatency plugin that I wrote to get hard numbers for the total end-to-end latency including the latency added by the GStreamer audio ringbuffers in the source and sink elements, the WASAPI audio engine (capture and render), the audio driver, and so on.

I look forward to hearing what your numbers are on Windows 7, 8.1, and 10 in all these configurations! ;)


1. The only ones missing are AAudio because it's very new and ASIO which is a proprietary API with licensing requirements.

2. It's no secret that although lots of people use GStreamer on Windows, the majority of GStreamer developers work on Linux and macOS. As a result the Windows plugins haven't always gotten a lot of love. It doesn't help that building GStreamer on Windows can be a daunting task . This is actually one of the major reasons why we're moving to Meson, but I've already written about that elsewhere!

3. My knowledge about the history of the decisions behind the Windows Audio API is spotty, so corrections and expansions on this are most welcome!

4. The ALSA drivers in the Linux kernel should not be confused with the ALSA userspace library.

Wednesday, March 14, 2018

Latency in Digital Audio

We've come a long way since Alexander Graham Bell, and everything's turned digital.

Compared to analog audio, digital audio processing is extremely versatile, is much easier to design and implement than analog processing, and also adds effectively zero noise along the way. With rising computing power and dropping costs, every operating system has had drivers, engines, and libraries to record, process, playback, transmit, and store audio for over 20 years.

Today we'll talk about the some of the differences between analog and digital audio, and how the widespread use of digital audio adds a new challenge: latency.

Analog vs Digital


Analog data flows like water through an empty pipe. You open the tap, and the time it takes for the first drop of water to reach you is the latency. When analog audio is transmitted through, say, an RCA cable, the transmission happens at the speed of electricity and your latency is:

wire length/speed of electricity

This number is ridiculously smallespecially when compared to the speed of sound. An electrical signal takes 0.001 milliseconds to travel 300 metres (984 feet). Sound takes 874 milliseconds (almost a second).

All analog effects and filters obey similar equations. If you're using, say, an analog pedal with an electric guitar, the signal is transformed continuously by an electrical circuit, so the latency is a function of the wire length (plus capacitors/transistors/etc), and is almost always negligible.

Digital audio is transmitted in "packets" (buffers) of a particular size, like a bucket brigade, but at the speed of electricity. Since the real world is analog, this means to record audio, you must use an Analog-Digital Converter. The ADC quantizes the signal into digital measurements (samples), packs multiple samples into a buffer, and sends it forward. This means your latency is now:

(wire length/speed of electricity) + buffer size

We saw above that the first part is insignificant, what about the second part?

Latency is measured in time, but buffer size is measured in bytes. For 16-bit integer audio, each measurement (sample) is stored as a 16-bit integer, which is 2 bytes. That's the theoretical lower limit on the buffer size. The sample rate defines how often measurements are made, and these days, is usually 48KHz. This means each sample contains ~0.021ms of audio. To go lower, we need to increase the sample rate to 96KHz or 192KHz.

However, when general-purpose computers are involved, the buffer size is almost never lower than 32 bytes, and is usually 128 bytes or larger. For single-channel 16-bit integer audio at 48KHz, a 32 byte buffer is 0.33ms, and a 128 byte buffer is 1.33ms. This is our buffer size and hence the base latency while recording (or playing) digital audio.

Digital effects operate on individual buffers, and will add an additional amount of latency depending on the delay added by the CPU processing required by the effect. Such effects may also add latency if the algorithm used requires that, but that's the same with analog effects.

The Digital Age


So everyone's using digital. But isn't 1.33ms a lot of additional latency?

It might seem that way till you think about it in real-world terms. Sound travels less than half a meter (1½ feet) in that time, and that sort of delay is completely unnoticeable by humansotherwise we'd notice people's lips moving before we heard their words.

In fact, 1.33ms is too small for the majority of audio applications!

To process such small buffer sizes, you'd have to wake the CPU up 750 times a second, just for audio. This is highly inefficient, and wastes a lot of power. You really don't want that on your phone or your laptop, and is completely unnecessary in most cases anyway.

For instance, your music player will usually use a buffer size of ~200ms, which is just 5 CPU wakeups per second. Note that this doesn't mean that you will hear sound 200ms after hitting "play". The audio player will just send 200ms of audio to the sound card at once, and playback will begin immediately.

Of course, you can't do that with live playback such as video calls—you can't "read-ahead" data you don't have. You'd have to invent a time machine first. As a result, apps that use real-time communication have to use smaller buffer sizes because that directly affects the latency of live playback.

That brings us back to efficiency. These apps also need to conserve power, and 1.33ms buffers are really wasteful. Most consumer apps that require low latency use 10-15ms buffers, and that's good enough for things like voice/video calling, video games, notification sounds, and so on.

Ultra Low Latency


There's one category left: musicians, sound engineers, and other folk that work in the pro-audio business. For them, 10ms of latency is much too high!

You usually can't notice a 10ms delay between an event and the sound for it, but when making music, you can hear it when two instruments are out-of-sync by 10ms or if the sound for an instrument you're playing is delayed. Instruments such as drum snare are more susceptible to this problem than others, which is why the stage monitors used in live concerts must not add any latency.

The standard in the music business is to use buffers that are 5ms or lower, down to the 0.33ms number that we talked about above.

Power consumption is absolutely no concern, and the real problems are the accumulation of small amounts of latencies everywhere in your stack, and ensuring that you're able to read buffers from the hardware or write buffers to the hardware fast enough.

Let's say you're using an app on your computer to apply digital effects to a guitar that you're playing. This involves capturing audio from the line-in port, sending it to the application for processing, and playing it from the sound card to your amp.

The latency while capturing and outputting audio are both multiples of the buffer size, so it adds up very quickly. The effects app itself will also add a variable amount of latency, and at 1.33ms buffer sizes you will find yourself quickly approaching a 10ms latency from line-in to amp-out. The only way to lower this is to use a smaller buffer size, which is precisely what pro-audio hardware and software enables.

The second problem is that of CPU scheduling. You need to ensure that the threads that are fetching/sending audio data to the hardware and processing the audio have the highest priority, so that nothing else will steal CPU-time away from them and cause glitching due to buffers arriving late.

This gets harder as you lower the buffer size because the audio stack has to do more work for each bit of audio. The fact that we're doing this on a general-purpose operating system makes it even harder, and requires implementing real-time scheduling features across several layers. But that's a story for another time!

I hope you found this dive into digital audio interesting! My next post will be is about my journey in implementing ultra low latency capture and render on Windows in the WASAPI plugin for GStreamer. This was already possible on Linux with the JACK GStreamer plugin and on macOS with the CoreAudio GStreamer plugin, so it will be interesting to see how the same problems are solved on Windows. Tune in!

Monday, February 26, 2018

Decoupling GStreamer Pipelines

This post is best read with some prior familiarity with GStreamer pipelines. If you want to learn more about that, a good place to start is the tutorial Jan presented at LCA 2018.

Elevator Pitch


GStreamer was designed with modularity, pluggability, and ease of use in mind, and the structure was somewhat inspired by UNIX pipes. With GStreamer, you start with an idea of what your dataflow will look like, and the pipeline will map that quite closely.

This is true whether you're working with a simple and static pipeline:

source ! transform ! sink

Or if you need complex and dynamic pipelines with varying rates of data flow:


The inherent pluggability of the system allows for quick prototyping and makes a lot of changes simpler than they would be in other systems.

At the same time, to achieve efficient multimedia processing, one must avoid onerous copying of data, excessive threading, or additional latency. Other features necessary are varying rates of playback, seeking, branching, mixing, non-linear data flow, timing, and much more, but let's keep it simple for now.

Modular Multimedia Processing


A naive way to implement this would be to have one thread (or process) for each node, and use shared memory or message-passing. This can achieve high throughput if you use the right APIs for zerocopy message-passing, but because of a lack of realtime guarantees on all consumer operating systems, the latency will be jittery and much harder to achieve.

So how does GStreamer solve these problems?

Let's take a look at a simple pipeline to try and understand. We generate a sine wave, encode it with Opus, mux it into an Ogg container, and write it to disk.


$ gst-launch-1.0 -e audiotestsrc ! opusenc ! oggmux ! filesink location=out.ogg


How does data make it from one end of this pipeline to the other in GStreamer? The answer lies in source pads, sink pads and the chain function.

In this pipeline, the audiotestsrc element has one source pad. opusenc and oggmux have one source pad and one sink pad each, and filesink only has a sink pad. Buffers always move from source pads to sink pads. All elements that receive buffers (with sink pads) must implement a chain function to handle each buffer.

Zooming in a bit more, to output buffers, an element will call gst_pad_push() on its source pad. This function will figure out what the corresponding sink pad is, and call the chain function of that element with a pointer to the buffer that was pushed earlier. This chain function can then apply a transformation to the buffer and push it (or a new buffer) onward with gst_pad_push() again.

The net effect of this is that all buffer handling from one end of this pipeline to the other happens in one series of chained function calls. This is a really important detail that allows GStreamer to be efficient by default.

Pipeline Multithreading


Of course, sometimes you want to decouple parts of the pipeline, and that brings us to the simplest mechanism for doing so: the queue element. The most basic use-case for this element is to ensure that the downstream of your pipeline runs in a new thread.

In some applications, you want even greater decoupling of parts of your pipeline. For instance, if you're reading data from the network, you don't want a network error to bring down our entire pipeline, or if you're working with a hotpluggable device, device removal should be recoverable without needing to restart the pipeline.

There are various  mechanisms to achieve such decoupling: appsrc/appsink, fdsrc/fdsink, shmsrc/shmsink, ipcpipeline, etc.  However, each of those have their own limitations and complexities. In particular, events, negotiation, and synchronization usually need to be handled or serialized manually at the boundary.

Seamless Pipeline Decoupling


We recently merged a new plugin that makes this job much simpler: gstproxy. Essentially, you insert a proxysink element when you want to send data outside your pipeline, and use a proxysrc element to push that data into a different pipeline in the same process.

The interesting thing about this plugin is that everything is proxied, not just buffers. Events, queries, and hence caps negotiation all happen seamlessly. This is particularly useful when you want to do dynamic reconfiguration of your pipeline, and want the decoupled parts to reconfigure automatically.

Say you have a pipeline like this:


pulsesrc ! opusenc ! oggmux ! souphttpclientsink


Where the souphttpclientsink element is doing a PUT to a remote HTTP server. If the server suddenly closes the connection, you want to be able to immediately reconnect to the same server or a different one without interrupting the recording. One way to do this, would be to use appsrc and appsink to split it into two pipelines:


pulsesrc ! opusenc ! oggmux ! appsink

appsrc ! souphttpclientsink


Now you need to write code to handle buffers that are received on the appsink and then manually push those into appsrc. With the proxy plugin, you split your pipeline like before:


pulsesrc ! opusenc ! oggmux ! proxysink

proxysrc ! souphttpclientsink


Next, we connect the proxysrc and proxysink elements, and gstreamer will automatically push buffers from the first pipeline to the second one.

g_object_set (psrc, "proxysink", psink, NULL);

proxysink also contains a queue, so the second pipeline will always run in a separate thread.

Another option is the inter plugin. If you use a pair of interaudiosink/interaudiosrc elements, buffers will be automatically moved between pipelines, but those only support raw audio or video, and drop events and queries at the boundary. The proxy elements push pointers to buffers without copying, and they do not care what the contents of the buffers are.

This example was a trivial one, but with more complex pipelines, you usually have bins that automatically reconfigure themselves according to the events and caps sent by upstream elements; f.ex decodebin and webrtcbin. This metadata about the buffers is lost when using appsrc/appsink, and similar elements, but is transparently proxied by the proxy elements.

The ipcpipeline elements also forward buffers, events, queries, etc (not zerocopy, but could be), but they are much more complicated since they were built for splitting pipelines across multiple processes, and are most often used in a security-sensitive context.

The proxy elements only work when all the split pipelines are within the same process, are much simpler and as a result, more efficient. They should be used when you want graceful recovery from element errors, and your elements are not a vector for security attacks.

For more details on how to use them, checkout the documentation and example! The online docs will be generated from that when we're closer to the release of GStreamer 1.14. There are a few caveats, but a number of projects are already using it with great success.

Saturday, February 3, 2018

GStreamer has grown a WebRTC implementation

In other news, GStreamer is now almost buzzword-compliant! The next blog post on our list: blockchains and smart contracts in GStreamer.

Late last year, we at Centricular announced a new implementation of WebRTC in GStreamer.  Today we're happy to announce that after community review, that work has been merged into GStreamer itself! The plugin is called webrtcbin, and the library is, naturally, called gstwebrtc.

The implementation has all the basic features, is transparently compatible with other WebRTC stacks (particularly in browsers), and has been well-tested with both Firefox and Chrome.

Some of the more advanced features such as FEC are already a work in progress, and others will be too—if you want them to be! Hop onto IRC on #gstreamer @ Freenode.net or join the mailing list.

How do I use it?


Currently, the easiest way to use webrtcbin is to build GStreamer using either gst-uninstalled (Linux and macOS) or Cerbero (Windows, iOS, Android). If you're a patient person, you can follow @gstreamer and wait for GStreamer 1.14 to be released which will include Windows, macOS, iOS, and Android binaries.

The API currently lacks documentation, so the best way to learn it is to dive into the source-tree examples. Help on this will be most appreciated! To see how to use GStreamer to do WebRTC with a browser, checkout the bidirectional audio-video demos.

Show me the code! [skip]


Here's a quick highlight of the important bits that should get you started if you already know how GStreamer works. This example is in C, but GStreamer also has bindings for Rust, Python, Java, C#, Vala, and so on.

Let's say you want to capture video from V4L2, stream it to a webrtc peer, and receive video back from it. The first step is the streaming pipeline, which will look something like this:

v4l2src ! queue ! vp8enc ! rtpvp8pay !
    application/x-rtp,media=video,encoding-name=VP8,payload=96 ! 
    webrtcbin name=sendrecv

As a short-cut, let's parse the string description to create the pipeline.

1
2
3
4
5
GstElement *pipe;

pipe = gst_parse_launch ("v4l2src ! queue ! vp8enc ! rtpvp8pay ! "
    "application/x-rtp,media=video,encoding-name=VP8,payload=96 !"
    " webrtcbin name=sendrecv", NULL);

Next, we get a reference to the webrtcbin element and attach some callbacks to it.

 1
 2
 3
 4
 5
 6
 7
 8
 9
10
11
12
13
14
15
16
17
18
19
GstElement *webrtc;

webrtc = gst_bin_get_by_name (GST_BIN (pipe), "sendrecv");
g_assert (webrtc != NULL);

/* This is the gstwebrtc entry point where we create the offer.
 * It will be called when the pipeline goes to PLAYING. */
g_signal_connect (webrtc, "on-negotiation-needed",
    G_CALLBACK (on_negotiation_needed), NULL);
/* We will transmit this ICE candidate to the remote using some
 * signalling. Incoming ICE candidates from the remote need to be
 * added by us too. */
g_signal_connect (webrtc, "on-ice-candidate",
    G_CALLBACK (send_ice_candidate_message), NULL);
/* Incoming streams will be exposed via this signal */
g_signal_connect (webrtc, "pad-added",
    G_CALLBACK (on_incoming_stream), pipe);
/* Lifetime is the same as the pipeline itself */
gst_object_unref (webrtc);

When the pipeline goes to PLAYING, the on_negotiation_needed() callback will be called, and we will ask webrtcbin to create an offer which will match the pipeline above.

 1
 2
 3
 4
 5
 6
 7
 8
 9
10
static void
on_negotiation_needed (GstElement * webrtc, gpointer user_data)
{
  GstPromise *promise;

  promise = gst_promise_new_with_change_func (on_offer_created,
      user_data, NULL);
  g_signal_emit_by_name (webrtc, "create-offer", NULL,
      promise);
}

When webrtcbin has created the offer, it will call on_offer_created()

 1
 2
 3
 4
 5
 6
 7
 8
 9
10
11
12
13
14
15
16
17
18
19
20
21
static void
on_offer_created (GstPromise * promise, GstElement * webrtc)
{
  GstWebRTCSessionDescription *offer = NULL;
  const GstStructure *reply;
  gchar *desc;

  reply = gst_promise_get_reply (promise);
  gst_structure_get (reply, "offer",
      GST_TYPE_WEBRTC_SESSION_DESCRIPTION, 
      &offer, NULL);
  gst_promise_unref (promise);

  /* We can edit this offer before setting and sending */
  g_signal_emit_by_name (webrtc,
      "set-local-description", offer, NULL);

  /* Implement this and send offer to peer using signalling */
  send_sdp_offer (offer);
  gst_webrtc_session_description_free (offer);
}

Similarly, when we have the SDP answer from the remote, we must call "set-remote-description" on webrtcbin.

1
2
3
4
5
6
7
answer = gst_webrtc_session_description_new (
    GST_WEBRTC_SDP_TYPE_ANSWER, sdp);
g_assert (answer);

/* Set remote description on our pipeline */
g_signal_emit_by_name (webrtc, "set-remote-description",
    answer, NULL);

ICE handling is very similar; when the "on-ice-candidate" signal is emitted, we get a local ICE candidate which we must send to the remote. When we have an ICE candidate from the remote, we must call "add-ice-candidate" on webrtcbin.

There's just one piece left now; handling incoming streams that are sent by the remote. For that, we have on_incoming_stream() attached to the "pad-added" signal on webrtcbin.

 1
 2
 3
 4
 5
 6
 7
 8
 9
10
11
12
13
14
15
static void
on_incoming_stream (GstElement * webrtc, GstPad * pad,
    GstElement * pipe)
{
  GstElement *play;

  play = gst_parse_bin_from_description (
      "queue ! vp8dec ! videoconvert ! autovideosink",
      TRUE, NULL);
  gst_bin_add (GST_BIN (pipe), play);

  /* Start displaying video */
  gst_element_sync_state_with_parent (play);
  gst_element_link (webrtc, play);
}

That's it! This is what a basic webrtc workflow looks like. Those of you that have used the PeerConnection API before will be happy to see that this maps to that quite closely.

The aforementioned demos also include a Websocket signalling server and JS browser components, and I will be doing an in-depth application newbie developer's guide at a later time, so you can follow me @nirbheek to hear when it comes out!

Tell me more!


The code is already being used in production in a number of places, such as EasyMile's autonomous vehicles, and we're excited to see where else the community can take it.

If you're wondering why we decided a new implementation was needed, read on! For a more detailed discussion into that, you should watch Matthew Waters' talk from the GStreamer conference last year. It's a great companion for this article!

But before we can dig into details, we need to lay some foundations first.

What is GStreamer, and what is WebRTC? [skip]


GStreamer is a cross-platform open-source multimedia framework that is, in my opinion, the easiest and most flexible way to implement any application that needs to play, record, or transform media-like data across an extremely versatile scale of devices and products. Embedded (IoT, IVI, phones, TVs, …), desktop (video/music players, video recording, non-linear editing, videoconferencing and VoIP clients, browsers …), to servers (encode/transcode farms, video/voice conferencing servers, …) and more.

But what I like the most about GStreamer is the pipeline-based model which solves one of the hardest problems in API design: catering to applications of varying complexity; from the simplest one-liners and quick solutions to those that need several hundreds of thousands of lines of code to implement their full featureset. 

If you want to learn more about GStreamer, Jan Schmidt's tutorial from Linux.conf.au is a good start.

WebRTC is a set of draft specifications that build upon existing RTP, RTCP, SDP, DTLS, ICE (and many other) real-time communication specifications and defines an API for making RTC accessible using browser JS APIs.

People have been doing real-time communication over IP for decades with the previously-listed protocols that WebRTC builds upon. The real innovation of WebRTC was creating a bridge between native applications and webapps by defining a standard, yet flexible, API that browsers can expose to untrusted JavaScript code.

These specifications are constantly being improved upon, which combined with the ubiquitous nature of browsers means WebRTC is fast becoming the standard choice for videoconferencing on all platforms and for most applications.

Everything is great, let's build amazing apps! [skip]


Not so fast, there's more to the story! For WebApps, the PeerConnection API is everywhere. There are some browser-specific quirks as usual, and the API itself keeps changing, but the WebRTC JS adapter handles most of that. Overall the WebApp experience is mostly 👍.

Sadly, for native code or applications that need more flexibility than a sandboxed JS app can achieve, there haven't been a lot of great options.

libwebrtc (Chrome's implementation), Janus, Kurento, and OpenWebRTC have traditionally been the main contenders, but after having worked with all of these, we found that each implementation has its own inflexibilities, shortcomings, and constraints.

libwebrtc is still the most mature implementation, but it is also the most difficult to work with. Since it's embedded inside Chrome, it's a moving target, the API can be hard to work with, and the project is quite difficult to build and integrate, all of which are obstacles in the way of native or server app developers trying to quickly prototype and try out things.

It was also not built for multimedia use-cases, so while the webrtc bits are great, the lower layers get in the way of non-browser use-cases and applications. It is quite painful to do anything other than the default "set raw media, transmit" and "receive from remote, get raw media". This means that if you want to use your own filters, or hardware-specific codecs or sinks/sources, you end up having to fork libwebrtc.

In contrast, as shown above, our implementation gives you full control over this as with any other GStreamer pipeline.

OpenWebRTC by Ericsson was the first attempt to rectify this situation, and it was built on top of GStreamer. The target audience was app developers, and it fit the bill quite well as a proof-of-concept—even though it used a custom API and some of the architectural decisions made it quite inflexible for most other use-cases.

However, after an initial flurry of activity around the project, momentum petered out, the project failed to gather a community around itself, and is now effectively dead.

Full disclosure: we worked with Ericsson to polish some of the rough edges around the project immediately prior to its public release.

WebRTC in GStreamer — webrtcbin and gstwebrtc


Remember how I said the WebRTC standards build upon existing standards and protocols? As it so happens, GStreamer has supported almost all of them for a while now because they were being used for real-time communication, live streaming, and in many other IP-based applications. Indeed, that's partly why Ericsson chose it as the base for OWRTC.

This combined with the SRTP and DTLS plugins that were written during OWRTC's development meant that our implementation is built upon a solid and well-tested base, and that implementing WebRTC features is not as difficult as one might presume. However, WebRTC is a large collection of standards, and reaching feature-parity with libwebrtc is an ongoing task.

Lucky for us, Matthew made some excellent decisions while architecting the internals of webrtcbin, and we follow the PeerConnection specification quite closely, so almost all the missing features involve writing code that would plug into clearly-defined sockets.

We believe what we've been building here is the most flexible, versatile, and easy to use WebRTC implementation out there, and it can only get better as time goes by. Bringing the power of pipeline-based multimedia manipulation to WebRTC opens new doors for interesting, unique, and highly efficient applications.

To demonstrate this, in the near future we will be publishing articles that dive into how to use the PeerConnection-inspired API exposed by webrtcbin to build various kinds of applications—starting with a CPU-efficient multi-party bidirectional conferencing solution with a mesh topology that can work with any webrtc stack.

Until next time!